Whether you’re looking to get into polymer clay or want something fun to do on a Sunday afternoon, we’ve got 16 simple polymer clay projects to have a crack at. From earrings and fridge magnets to wall hangings and tiny vases, there’s plenty of fun things you can make using polymer clay.
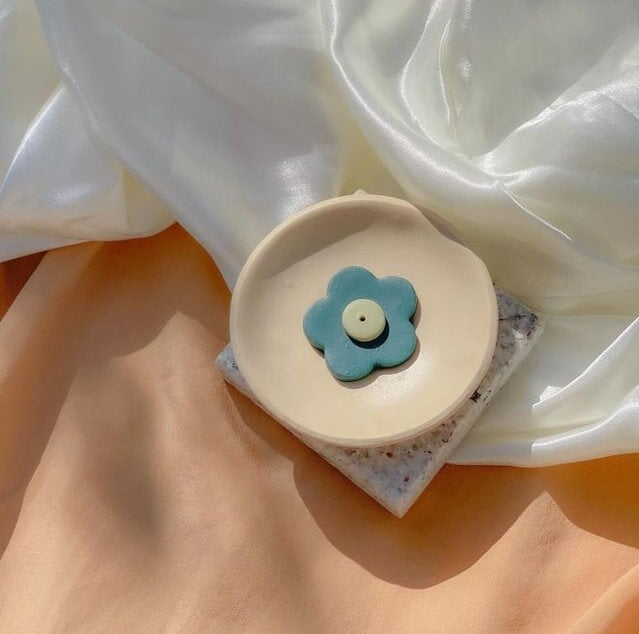
1. Incense holder

Image: firebabystudio
How cute are these incense holders?! Spruce up your home or take a step back to the 60’s with a fun, flower power incense holder using polymer clay.
For this project, grab a large jar or bottle and press it into the clay to create a circle, then mould the edges to create a small dish. Before baking, pinch the edges (or use an old butter knife) to get crisp and even edges. For the flower, you can use cookie cutters to create this shape in the clay – just don’t forget to add a small hole, then bake the two in the oven together to set. Handy hint: You can also glue the two pieces together after baking for extra hold.
Once the clay is dry, you’re ready to paint!
2. Colourful hoop earrings

Image: thalassa.designs
Add a statement to your outfit or make a pair and gift to a friend. Whichever you choose, polymer clay can be used to create fun earrings like this. If you don’t feel like painting or if you’re starting a mini project, our Make n Bake Polymer Clay comes in a range of colours to try out.
Start by kneading the clay until you have a long, snake shape. Cut the clay with a knife for an even end, then curl it up to make a circle. You can add fun accents like these using another colour, then pop a hole in the clay for a jump ring. Bake your new creation, then once it’s cool, glue the pieces for extra security. To finish off, glue the earring post and add your jump ring, leave to dry. Then they’re ready to wear!
3. Pastel earrings

Another simple polymer clay project worth having a go at, are these pastel polymer clay earrings. Whether you try a marbled look, a pastel, or a metallic look, have fun throwing clay and your creativity about. Best of all, we’ve got an easy step-by-step project so you can create your own polymer clay earrings here.
4. Marble coasters

Image: miscellanycraft
Impress your friends and family with handmade coasters or match your coasters to your home aesthetic or décor while having a bit of fun too.
To get started, roll your clay out and combine your favourite colours to create the marble effect.
If you get stuck, take a look at our pastel polymer clay earring project where we combined pastel clays to create a marbled look. You can use egg rings, a large jar or bottle to create the circle shapes for your coasters, then smooth the edges with a knife before baking. Once baked, your work can be sealed with a clay varnish for longer life. Now you’re ready to show off your new clay creations.
5. Wall hanging

Image: creatiivenatiive
Who knew you could make funky wall hangings like this using polymer clay too? Match the colours of your clay to suit your bedrooms, guestrooms or loungerooms.
Roll your clay out into snake shapes and cut the end with a knife for an even end. Then continue this technique with different colours. Gently press the clay canes together to join them and add two holes to hang your creation later. Then pop your hanging into the oven to set. If you get stuck, check out how to make clay canes in our polymer clay techniques.
Once it’s set, you can thread string or a chain through the holes to hang your new masterpiece!
6. Pot planter

Image: hraeshop
Combine your green thumb with your creativity and make a pot planter from polymer clay. For pot planters, use an old tin or can and mould your clay around the item. Then using an old butter knife, cut off the excess clay from the edges. We have a handy project you can check out for steps here. Once you’re happy with your creation, bake your clay in the oven. After cooling (also known as curing), you can pick up the paints and add a burst of colour to your home décor piece.
7. Beaded necklace

Image: karenstokesdesign
Create a unique, one-of-a-kind necklace from polymer clay beads. Whether you choose coloured clay or paint your own clay, it’s not only a great way to spend a Sunday afternoon, but you’ll also have something fun to wear afterwards.
We’ve got a handy how to lesson for making polymer clay beads, that you can take a look at, to get the hang of things, before you grab the clay out and try it yourself. One of the best things about working with polymer clay is that it can be sanded, drilled and painted once it’s cooled down, so the only limits are your imagination!
8. Hair clips

Image: girlscapeuk
If you’re looking for another fun idea you can create or make alongside your little artist, try hair clips! From flowers to snails, frogs, and bees, get creative and have some fun!
You can use cookie cutters to get the right shape. Or have a go at creating these shapes by moulding the clay into shapes to build them, then flattening them before popping them into the oven. Once they’re cool, you can add some varnish and paint your creations before attaching them to a hair clip.
9. Ring holder and trinket tray

Image: enchantedwattle
Tidy up and organise your jewellery with a project like this! Whether you try a ring holder or a trinket dish, these projects are simple to create, and they look lovely on a bedside table or dresser.
For a ring holder, grab your clay and roll it out flat, then mould a piece together to create a cone shape. You’ll need to keep the base flat so it can stand up (you can use a knife to get a clean, sharp edge). A good size is around 6cm high and 2cm wide otherwise it will be difficult to bake in the oven. Then pop your creation in the oven to bake.
For a trinket tray, use a glass jar or bottle to get a nice, even circle, then mould the edges upwards. Pinch the top as you work, to flatten the edges and create a small bowl-type shape (this will stop your jewellery from falling off). You can add small details or etchings like this idea, then bake your creation in the oven!
10. Add creativity to your home Décor

Image: claydreamer.studios
If vases are a little too challenging or you’re looking for something fun to make with left-over polymer clay, add a bit of fun to your home décor pieces like these funky daisies. Just keep in mind, once you start, it’s a little difficult to stop!
Grab some cookie cutter shapes to create flowers then bake them in the oven to bake. Once dry, you can paint your pieces, then glue them to your vase or décor piece of choice, too easy!
11. Christmas decorations

Image: katie.minucci
Whether Christmas is just around the corner, or you wish it was Christmas every day, you can use polymer clay to create your own decorations. We say skip the traditional Snowman or Santa and try something fun like a fried egg or an avocado like this idea.
If you’re planning to make something round like an apple or a traditional bauble, you might want to ‘bulk’ your creation first. Sounds technical, but hear us out here, grab your rolled out clay, and scrunch some aluminium foil into a ball. Wrap the clay around the ball, add a hole to hang your decoration then pop it in the oven to set -–this is why you won’t want to put polymer clay in the oven, or it can melt. Once your project is dry, you can paint and hang your creation!
12. Tiny vase

Image: yumsterlife
Add some creative flair to a dull corner with this tiny vase idea. Not only are these tiny vases super cute, but they’re also great for beginners.
Roll your clay out then pop some aluminium foil around something small like a salt and pepper shaker for shape, then lift the shaker out of the foil and mould the clay around the foil. Foil’s great because it can go in the oven and it’s heavy in structure, so it won’t collapse. Once your clay creation is cool, pull the foil off and you can paint your new vase.
13. Key rings

Image: artforbugz
Never loose your keys again with this handy clay creation. Plus, you’ll have a fun project to try too! Before starting, grab an old keyring and take off the ring with pliers, or purchase the rings yourself.
Roll your clay flat and then grab a cookie cutter and press the shape into the clay. Remove the excess with a butter knife and mould the edges. Pop a hole in the side with the end of a pencil or paint brush, then bake your new artwork. Once cool, you can add some fun colours or designs with paint, then add your clips!
14. Magnets

Image: tryingtobehaunted
This is a simple polymer clay project that’s great to make with the little ones on a rainy day or when boredom takes over in the school holidays.
Roll some clay out and grab some cookie cutters to create shapes. You can knead coloured clays together, then roll it out to create marbled effects too. Or if you’re using plain polymer clay you can paint the clay. Pop your shapes into the oven then once they’re cool, glue a strip of magnet to the back before popping them on the fridge!
15. Clay necklace

Image: mrslizziep.handmade
Another fun activity to make with kids are these shell necklaces! These don’t take too long to create, so they’re a fun project to make alongside your little artist. Grab some cookie cutters and press down on the clay to create a shape. Then roll a small piece of clay to create a ball for a bead. Use the end of a pencil or paint brush to add a hole to your bead and add a hole to your cookie cutter clay too. Then add etchings on your clay for small details. Pop the two pieces into the oven, then once set, you can grab some thread and tie your clay onto the thread to create a necklace!
16. Cow pot planter

Image: by_kimimi
Add some fun to your garden, balcony or around the home with this cow pot planter. You can create your favourite animal or try this project with a little artist and create fun, farm animals.
Create a pinch pot with polymer clay then create small balls of clay for the head and features like the eyes, mouth and ears. Bake your pieces in the oven, then once cool you can glue each piece together. Grab the paints and a spot of varnish and leave to dry. Once dry, pop in your favourite plant!
Looking for a little bit of help before getting started? Or not too sure what you can bake and how long to bake it for? Check out these 20 polymer clay tips and tricks for beginners, before starting. Or if you’re looking for more ways to create patterns in polymer clay check out our how to video.
We hope that you feel inspired to create one (or all!) of these simple polymer clay projects. As always we’d love to see your work, and #montmarteart or tag us @montmarteart on Instagram or Facebook, so we can check it out!


