


Learning to create comic art is a fun and challenging experience that is well worth exploring. If you have a flare for creative ideas, then bring your imagination to life on the page through this classic storytelling medium. Best of all, you’re practising your art and building a new skill at the same time!
Check out 8 handy techniques below to kick off your comic drawing journey.
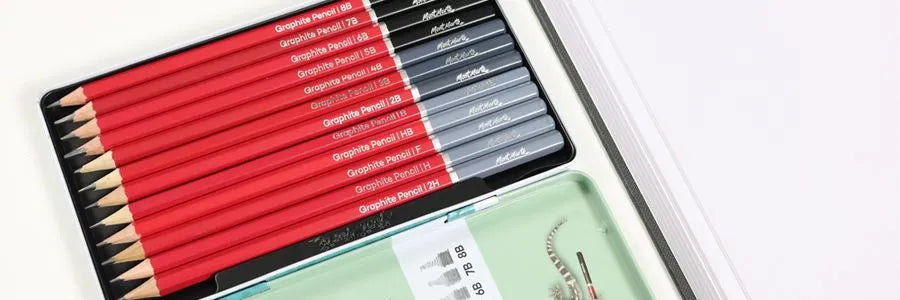
1. Graphic art materials
This first one isn’t a technique as such, but we thought we’d run through the different supplies you can use to have a go at comic book drawing. You can use a variety of art supplies to build your designs, including:
- Graphic Fineliners or Technical Drawing Pens
- Markers
- Gouache
Starting with graphite pencils, it’s a good idea to sketch out your characters, framing, and panel placement on the page. Pencils are great for mapping out ideas as they can be erased easily for drafting purposes. Once you’ve settled on a design, grab some fineliners or drawing pens to ink the outlines and commit it to the page. Next use brush pens, markers, gouache, watercolours, paint pens, or a combination of those materials to add colour! Add any dialogue in last, using the drawing pens.
2. Character design
Before you start sketching out your comic page, it helps to know who your characters are and what they represent in the story. Character design is all about thinking through your ideas and making them visible on the page.
Start by conceptualising the characters for your comic—who are they, and what makes them interesting? Think about how they help to drive the story forward—are they on a mission, facing a challenge, or going through a transformation?
Consider their archetype—are they a hero, a villain, a sidekick, or something in between? Most stories have a protagonist and antagonist, so this can help guide your visual choices.
Now get creative with their look! Think about their clothing, accessories, and colours. What does their outfit say about them? Are they neat and uniformed, or rough and rebellious?
Sketch out a few different designs and play around with their posture, facial features, and style until you land on something that feels right for your comic. These characters will carry your story, so take your time developing a design that’s expressive and fun to draw over and over again!
3. Comic book page drawing
Now that you've got your materials sorted, it's time to tackle the comic book page itself. Consider your comic book layout – how many panels will you have, and how will they flow? Create a rough sketch of your page to plan out the arrangement of your illustrations. Pay attention to how each panel interacts with the others. Are you going for a traditional grid, or do you want to break free with dynamic, irregular panels? Remember, the layout should enhance the storytelling.
Once you're happy with the placement of your panels, it's time to grab your graphite pencils and lightly sketch them onto your paper. Draft and redraft the layout until you’re happy with the overall design, keeping in mind that you will likely repeat similar layouts throughout the comic book.
4. Drawing motion
Comics are a visual storytelling medium, and what better way to bring your story to life than by capturing motion? Whether it's a superhero in mid-flight or a character simply walking down the street, conveying motion adds depth to your illustrations.
Motion in comics is about capturing a sense of movement and energy. Use dynamic lines to indicate speed – shorter, more jagged lines for rapid motion, and longer and smoother lines for slower movement. Add speed lines radiating from the focal point of the action to highlight your character’s pace.
Experiment with the positioning of limbs and clothing to suggest direction and intensity. Outfits may wrinkle or buckle as the limbs bend and contract during movement. Try drawing blurred images behind a moving subject to emphasise their sense of speed and urgency. Motion is all about experimentation, so don't be afraid to try different styles until you find what works best for your story.
5. Drawing with emphasis
Want to make certain elements pop off the page? Let’s learn how to emphasise. Think of it as pointing a spotlight onto specific details to draw the eye and direct the viewing experience. Whether it's a character's expression, a crucial object, or a pivotal moment, try using thicker lines, bolder colours, or unique framing to draw attention.
Experiment with high-contrast shadows and highlights to create depth and guide the viewer's eye. Consider using a different comic art style for the focus element, such as ramping up the realism amid stylised surroundings. Play with composition, framing the important element in a unique way to add visual interest and make it centre stage.
Comic books have loads of classic styles and graphics you can research to create emphasis. Think of the iconic flash effect, where tapered black lines surround the emphasised subject in a circle. This draws the eye right into the centre of these lines, making it the focus of the panel. Emphasis adds visual interest and ensures your readers focus on what matters most for storytelling purposes.
6. Drawing dialogue
Speech bubbles and captions are the unsung heroes of comics – they’re your story’s voice on the page! When drawing dialogue, consider how the placement of speech bubbles guides the reading flow. Connect the bubbles logically and use the shape and style of the bubbles to adjust the tone of voice and atmosphere.
A jagged, uneven bubble might suggest excitement or urgency, while a smooth, rounded one can indicate a calm conversation. Don't forget to leave enough space for your characters to breathe – nobody likes a cramped conversation! Dialogue should complement the art, not compete with it.
You may want to save adding the text itself with fineliners until the end, so any potential dimensions, highlights, and paint have time to dry inside your speech bubbles. It’s up to you how you piece your comic together!
7. Inking
Inking is where your sketches transform your drafted design into polished artwork. Grab your Graphic Fineliners or Technical Drawing Pens and ink the outlines to commit them to the page. Use varying line weights to add depth and shadows, emphasizing focus areas. Crosshatch or stipple for shading and texture.
Inking refines your drawings, adding clarity and definition to make your story easier to read. Experiment with different ink outlines and styles – whether it's smooth and clean lines or more jagged and expressive strokes. Watch as the ink transforms your rough concept into proper comic art!
8. Comic book colouring
Make your creation uniquely yours by adding colour! Whether you like the traditional feel of watercolours, the boldness of markers, or the versatility of paint pens, colour provides an extra level of control over your storytelling. Be mindful of your chosen palette – it can help set the mood and tone for your comic.
Different colours can evoke various emotions and boost the overall impact of your narrative. Certain shades can embody different time periods – think sepia tones for a vintage effect. You may want no colours at all, opting for a greyscale, monochromatic palette to keep things strikingly simple.
Think about the overall tone you want to convey – warm colours for a cozy scene or cool colours for a mysterious atmosphere. Colouring comics creates an extra layer of emotion and impact in the panels, making them engaging and memorable.
Now you know some graphic art techniques, you’re ready to try drawing comics at home! Stock up on some Real Brush Pens, Technical Drawing Pens, and Markers to set yourself up to create.
If you feel inspired to explore comic book techniques, #montmarteart or tag us @montmarteart on Instagram or Facebook. We’d love to see what you create!
Dive into our Projects & How-to collection for tonnes more ideas and inspo. Stay up to date with our latest products, art lessons, hacks, and more, by subscribing to Creative Connection down below.